跨域详解
目录
- 什么是同源策略及其限制内容
- window.name + iframe
- location.hash + iframe
- document.domain + iframe
- JSONP
- postMessage
- WebSocket
- 总结
- 参考
什么是同源策略及其限制内容
同源策略是一种约定,它是浏览器最核心也最基本的安全功能,如果缺少了同源策略,浏览器很容易受到 XSS、CSRF 等攻击。所谓同源是指"协议+域名+端口"三者相同,即便两个不同的域名指向同一个 ip 地址,也非同源。

同源策略主要应用于从脚本访问数据,但对于图像、视频、CSS 和脚本的获取不受限制。
同源策略限制内容有:
- Ajax 请求不能读取响应
- Cookie、LocalStorage 和 IndexDB 无法读取
- DOM 无法获得
但不限制的内容:
- img 标签
- link 标签
- script 标签
- videos 标签
- iframe 标签
下面整理所有跨域解决方案。
window.name + iframe
这个方案利用了 window.name 属性的独特之处:name 值在不同的页面(甚至不同域名)加载后依旧存在,并且可以支持非常长的 name 值(2MB)。
具体过程:
                  FIRST iframe.onload
domain1 域的页面A -------------------------> domain2 域的页面B
                       |                             |
   READ window.name -> |                             |
SECOND iframe.onload ->|           SET window.name ->|
                       |                             |
                       |------>domain1 域的代理页面<---|
假设有三个页面:
- 页面A:www.domain1.com/a.html
- 代理页面: www.domain1.com/proxy.html
- 页面B:www.domain2.com/b.html
其中页面A和代理页面是同一个域名下的。
domain1 的页面A:
const proxy = function(url, callback) {
    let state = 0;
    const iframe = document.createElement('iframe');
    // 加载跨域页面
    iframe.src = url;
    // onload 事件会触发2次,第1次加载跨域页,并留存数据于 window.name
    iframe.onload = function() {
        if (state === 1) {
            // 第2次 onload (同域proxy页)成功后,读取同域 window.name 中数据
            callback(iframe.contentWindow.name);
            destoryFrame();

        } else if (state === 0) {
            // 第1次 onload (跨域页)成功后,切换到同域代理页面
            iframe.contentWindow.location = 'http://www.domain1.com/proxy.html';
            state = 1;
        }
    };
    document.body.appendChild(iframe);
    // 获取数据以后销毁这个iframe,释放内存;这也保证了安全(不被其他域frame js访问)
    function destoryFrame() {
        iframe.contentWindow.document.write('');
        iframe.contentWindow.close();
        document.body.removeChild(iframe);
    }
};

// 请求跨域b页面数据
proxy('http://www.domain2.com/b.html', function(data){
    alert(data);
});
domain1 的代理页面 proxy.html:
<script>
    // 可以为一个空页面
</script>
domain2 的页面B:
<script>
    // 将需要跨域的数据塞进 window.name 中
    window.name = 'This is domain2 data!';
</script>
通过 iframe 的 src 属性由外域转向本地域,跨域数据即由 iframe 的 window.name 从外域传递到本地域。这个就巧妙地绕过了浏览器的跨域访问限制,但同时它又是安全操作。
location.hash + iframe
实现方式类同于 window.name + iframe,页面A想要同页面B跨域传递数据,可以通过代理页面 proxy.html 来实现。
具体过程:
                  hashchange
domain1 域的页面A ------------> domain2 域的页面B-----
  |                                                |
  | <-- onProxyCallback              hashchange -->|
  |                                                |
  |                                                |
  ---------------domain1 域的代理页面 <--------------|
也同样有三个页面:
- 页面A:www.domain1.com/a.html
- 代理页面: www.domain1.com/proxy.html
- 页面B:www.domain2.com/b.html
domain1 的页面A:
<!-- 请求页面B -->
<iframe id="iframe" src="http://www.domain2.com/b.html" style="display:none;"></iframe>
<script>
    const iframe = document.getElementById('iframe');
    // 向页面B传 hash 值
    setTimeout(function() {
        iframe.src = iframe.src + '#user=admin';
    }, 1000);

    // 开放给同域 proxy.html 的回调方法
    function onProxyCallback(res) {
        alert('data from c.html ---> ' + res);
    }
</script>
domain1 的代理页面:
<script>
    // 监听页面B b.html 传来的hash值
    window.onhashchange = function () {
        // 再通过操作同域页面A a.html 的回调函数,将结果传回
        // window.parent.parent 指向页面A
        window.parent.parent.onProxyCallback('hello: ' + location.hash.replace('#user=', ''));
    };
</script>
domain2 的页面B:
<!-- 加载代理页面 proxy.html -->
<iframe id="iframe" src="http://www.domain1.com/proxy.html" style="display:none;"></iframe>
<script>
    const iframe = document.getElementById('iframe');
    // 监听页面A传来的 hash 值,再传给 proxy.html
    window.onhashchange = function () {
        // 使用 location.hash 处理一些逻辑
        iframe.src = iframe.src + location.hash;
    };
</script>
document.domain + iframe
此方案仅限主域相同,子域不同的跨域应用场景。实现原理:两个页面都通过 js 强制设置 document.domain 为基础主域,就实现了同域。
具体过程:
                  SET document.domain = 'domain.com'
parent.domain.com --------------------------------> child.domain.com
      |                                                 |
      |                                                 |
      |          READ window.parent.data                |
      |<------------------------------------------------|
设有两个主域相同的页面:
- 页面A: parent.domain.com
- 页面B: child.domain.com
页面A:
<!-- 加载页面B -->
<iframe id="iframe" src="http://child.domain.com/b.html"></iframe>
<script>
    document.domain = 'domain.com';
    window.user = 'admin';
</script>
页面B:
<script>
    document.domain = 'domain.com';
    // 获取父窗口中变量
    console.log('get js data from parent ---> ' + window.parent.user);
</script>
JSONP
JSONP 的原理就是利用 <script> 标签没有跨域限制,通过 <script> 标签src属性,发送带有callback 参数的GET请求,服务端将接口返回数据拼凑到 callback 函数中,返回给浏览器,浏览器解析执行,从而前端拿到 callback 函数返回的数据。
<!-- domain1 域的页面 -->
 <script>
    const script = document.createElement('script');
    script.type = 'text/javascript';

    // 传参一个回调函数名给后端,方便后端返回时执行这个在前端定义的回调函数
    script.src = 'http://www.domain2.com:8080/login?user=admin&callback=handleCallback';
    document.head.appendChild(script);

    // 回调执行函数
    function handleCallback(res) {
        alert(JSON.stringify(res));
    }
 </script>
服务端返回如下(返回时即执行全局函数):
// 返回资源内的脚本
handleCallback({"success": true, "user": "admin"})
不过 JSONP 也有缺点,它只能发送 Get 一种请求,无法发送 Post 请求。
CORS
CORS 是一个 W3C 标准,全称是"跨域资源共享"(Cross-origin resource sharing)。它定义了浏览器与服务器如何实现跨源通信,允许浏览器向跨源服务器,发出 XMLHttpRequest 请求,从而克服了 AJAX 只能同源使用的限制。
CORS 背后的基本思路就是使用自定义的 HTTP 头部允许浏览器和服务器相互了解,以确实请求或响应应该成功还是失败。
CORS 需要浏览器和服务器同时支持。目前,所有浏览器都支持该功能,IE浏览器不能低于IE10。
浏览器将 CORS 跨域请求分为简单请求和非简单请求。
简单请求
不会触发 CORS 预检的请求称为简单请求,一般情况下只关注前两项:
- 使用下列方法之一:Head、Get、Post
-
只使用了如下的安全首部字段,不得人为设置其他首部字段:
- Accept
- Accept-Language
- Content-Language
- Content-Type 仅限于以下:
- application/x-www-form-urlencoded
- multipart/form-data
- text/plain
- 请求中的任意 XMLHttpRequestUpload 对象均没有注册任何事件监听器 (针对 XMLHttpRequest.upload 属性)
- 请求中没有使用 ReadableStream 对象(针对 Fetch API)
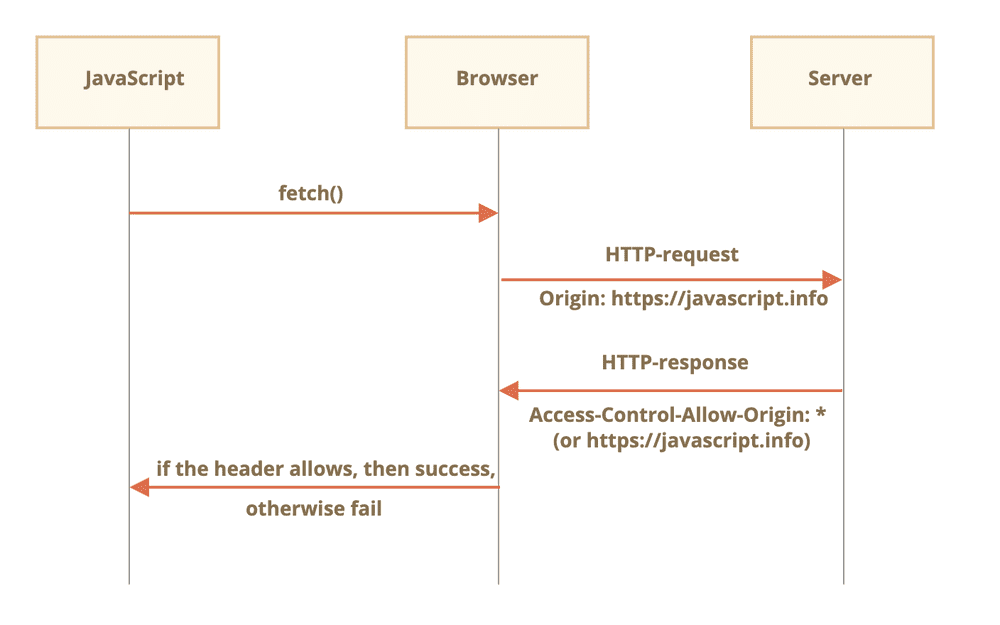
对于简单请求,浏览器直接发出 CORS 请求。具体来说,就是在头信息之中,增加一个 Origin 字段:
// 发送简单请求
GET /cors HTTP/1.1

Origin: http://api.bob.com

Host: api.alice.com
Accept-Language: en-US
Connection: keep-alive
User-Agent: Mozilla/5.0...
上面的头信息中,Origin 字段用来说明,本次请求来自哪个源(协议 + 域名 + 端口)。服务器根据这个值,决定是否同意这次请求。
CORS 请求设置的响应头字段,都以 Access-Control-开头:
-
Access-Control-Allow-Origin:必选
- 含义:它的值要么是请求时 Origin 字段的值,要么是一个
*,表示接受任意域名的请求
- 含义:它的值要么是请求时 Origin 字段的值,要么是一个
-
Access-Control-Allow-Credentials:可选
- 含义:布尔值,表示是否允许发送 Cookie。默认情况下,Cookie 不包括在 CORS 请求之中。设为true,即表示服务器明确许可,Cookie 可以包含在请求中,一起发给服务器。这个值也只能设为 true,如果服务器不要浏览器发送 Cookie,删除该字段即可。
-
Access-Control-Expose-Headers:可选
- 含义:CORS 请求时,XMLHttpRequest 对象的 getResponseHeader() 方法只能拿到6个基本字段,如果想拿到其他字段,就必须在 Access-Control-Expose-Headers 里面指定
- Cache-Control
- Content-Language
- Content-Type
- Expires
- Last-Modified
- Pragma
下面是一个简单请求图示:

预检请求
不同时满足上面条件的,都属于非简单请求。浏览器对这两种的处理,是不一样的。
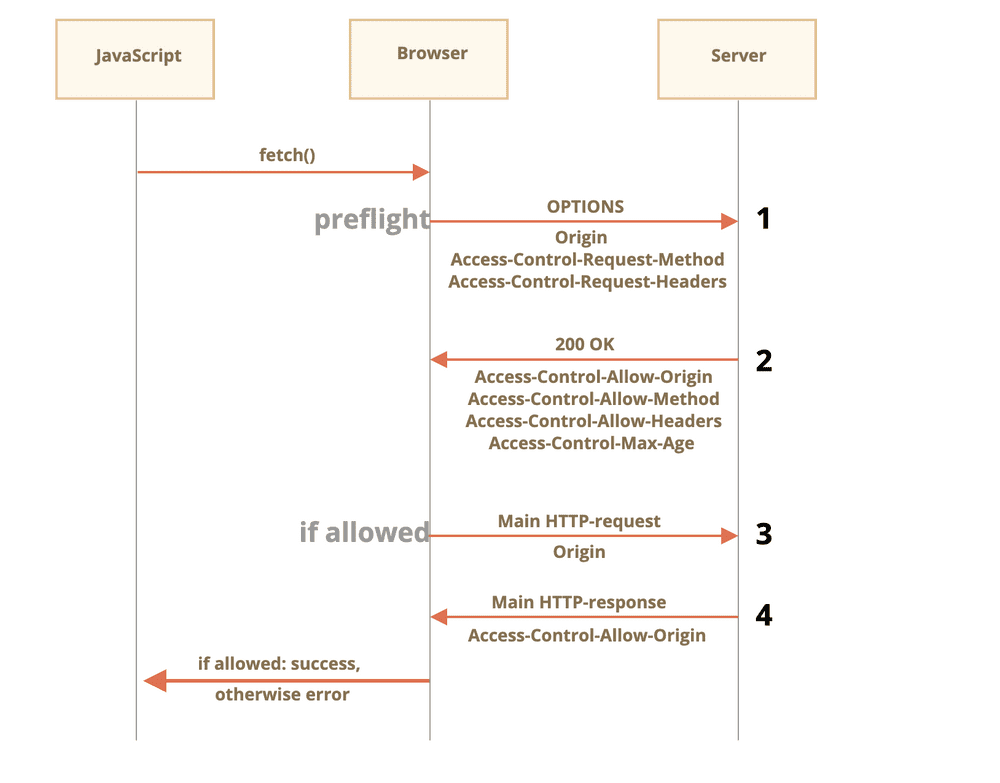
非简单请求的 CORS 请求,会在正式通信之前,增加一次 HTTP 查询请求,称为"预检"请求(preflight)。
预检"请求用的请求方法是 OPTIONS,表示这个请求是用来询问的。请求头信息里面,关键字段是 Origin,表示请求来自哪个源。除了 Origin 字段,"预检"请求的头信息包括两个特殊字段。
OPTIONS /cors HTTP/1.1

Origin: http://api.bob.com
// 新增的两个特殊字段
Access-Control-Request-Method: PUT
Access-Control-Request-Headers: X-Custom-Header

Host: api.alice.com
Accept-Language: en-US
Connection: keep-alive
User-Agent: Mozilla/5.0..-
Access-Control-Request-Method:必选
- 含义:用来列出浏览器的 CORS 请求会用到哪些HTTP方法,上例是PUT。
-
Access-Control-Request-Headers:可选
- 含义:该字段是一个逗号分隔的字符串,指定浏览器 CORS 请求会额外发送的头信息字段,上例是 X-Custom-Header
预检请求回应
服务器收到"预检"请求以后,检查了 Origin、Access-Control-Request-Method 和 Access-Control-Request-Headers字段以后,确认允许跨源请求,就可以做出回应:
-
Access-Control-Allow-Origin:必选
- 含义:它的值要么是请求时 Origin 字段的值,要么是一个
*,表示接受任意域名的请求
- 含义:它的值要么是请求时 Origin 字段的值,要么是一个
-
Access-Control-Allow-Methods:必选
- 含义:它的值是逗号分隔的一个字符串,表明服务器支持的所有跨域请求的方法。注意,返回的是所有支持的方法,而不单是浏览器请求的那个方法。这是为了避免多次"预检"请求。
-
Access-Control-Allow-Headers
- 含义:如果浏览器请求包括 Access-Control-Request-Headers 字段,则 Access-Control-Allow-Headers 字段是必需的。它也是一个逗号分隔的字符串,表明服务器支持的所有头信息字段,不限于浏览器在"预检"中请求的字段。
-
Access-Control-Allow-Credentials:可选
- 含义:该字段与简单请求时的含义相同。用来表明是否需要 Cookie 等凭据的传递。
-
Access-Control-Max-Age:可选
- 含义:用来指定本次预检请求的有效期,单位为秒。
下面是一个非简单请求图示:

CORS 跨域示例
下面提供几个 CORS 示例
Ajax
XMLHttpRequest 默认支持跨域,只需要服务器支持就可以,只是跨域默认不带 Cookie,开启需要设置 xhr.withCredentials。不过值得注意的是,如果 XMLHttpRequest 请求设置了 withCredentials 属性,那么服务器不得设置 Access-Control-Allow-Origin 的值为 * 。
const xhr = new XMLHttpRequest();
// 前端设置是否带cookie
xhr.withCredentials = true;

let json = JSON.stringify({
  name: "John",
  surname: "Smith"
});

xhr.open("POST", '/submit')
// 非简单请求字段
xhr.setRequestHeader('Content-type', 'application/json; charset=utf-8');

xhr.send(json);

xhr.onload = function() {
    if (xhr.status == 200) {
        console.log(xhr.response);
    }
};
Fetch
最新的 Fetch API 是支持跨域的,也支持跨域传递 Cookie,只需要配置 mode 和 credentials 两个选项。
let response = await fetch('https://site.com/service.json', {
  // 非简单请求
  method: 'PATCH',
  headers: {
    'Content-Type': 'application/json',
    'API-Key': 'secret'
  },
  // 是否传递凭据(Cookie)
  credentials: "include",
  // 默认为 no-cors,开启需要启用 cors
  mode: 'cors'
});
Node
原生
const http = require('http');
const server = http.createServer();
const qs = require('querystring');

server.on('request', function(req, res) {
    let postData = '';
    // 数据块接收中
    req.addListener('data', function(chunk) {
        postData += chunk;
    });
    // 数据接收完毕
    req.addListener('end', function() {
        postData = qs.parse(postData);
        // 跨域后台设置
        res.writeHead(200, {
            // 后端允许发送Cookie
            'Access-Control-Allow-Credentials': 'true',
            // 允许访问的域(协议+域名+端口)
            'Access-Control-Allow-Origin': 'http://www.domain1.com',
             // 此处设置的 cookie 还是 domain2 的而非 domain1
             // 因为后端也不能跨域写 cookie (nginx 反向代理可以实现)
             // 但只要 domain2 中写入一次 cookie 认证
             // 后面的跨域接口都能从 domain2 中获取 cookie,从而实现所有的接口都能跨域访问
             // HttpOnly的作用是让js无法读取cookie
            'Set-Cookie': 'l=a123456;Path=/;Domain=www.domain2.com;HttpOnly'
        });

        res.write(JSON.stringify(postData));
        res.end();
    });
});

server.listen('8080');
console.log('Server is running at port 8080...');
koa 中间件:
// koa-cors
const URL = require('url');
/**
 * 关键点:
 * 1、如果需要支持 cookies,
 *    Access-Control-Allow-Origin 不能设置为 *,
 *    并且 Access-Control-Allow-Credentials 需要设置为 true
 *    (注意前端请求需要设置 withCredentials = true)
 * 2、当 method = OPTIONS 时, 属于预检(复杂请求), 当为预检时, 可以直接返回空响应体, 对应的 http 状态码为 204
 * 3、通过 Access-Control-Max-Age 可以设置预检结果的缓存, 单位(秒)
 * 4、通过 Access-Control-Allow-Headers 设置需要支持的跨域请求头
 * 5、通过 Access-Control-Allow-Methods 设置需要支持的跨域请求方法
 */
module.exports = async function (ctx, next) {
  const origin = URL.parse(ctx.get('origin') || ctx.get('referer') || '');
  if (origin.protocol && origin.host) {
    ctx.set('Access-Control-Allow-Origin', `${origin.protocol}//${origin.host}`);
    ctx.set('Access-Control-Allow-Methods', 'POST, GET, OPTIONS, DELETE, PUT');
    ctx.set('Access-Control-Allow-Headers', 'X-Requested-With, User-Agent, Referer, Content-Type, Cache-Control,accesstoken');
    ctx.set('Access-Control-Max-Age', '86400');
    ctx.set('Access-Control-Allow-Credentials', 'true');
  }
  if (ctx.method !== 'OPTIONS') {
    // 如果请求类型为非预检请求,则进入下一个中间件(包括路由中间件等)
    await next();
  } else {
    // 当为预检时,直接返回204,代表空响应体
    ctx.body = '';
    ctx.status = 204;
  }
};


// app.js
const cors = require('./middlewares/koa-cors');
app.use(cors); // 跨域
postMessage
postMessage 是 HTML5 XMLHttpRequest Level 2 中的API,且是为数不多可以跨域操作的 window 属性之一,它可用于解决以下方面的问题:
- 页面和其打开的新窗口的数据传递
- 多窗口之间消息传递
- 页面与嵌套的 iframe 消息传递
- 上面三个场景的跨域数据传递
用法:postMessage(data,origin) 方法接受两个参数:
- data:html5规范支持任意基本类型或可复制的对象,但部分浏览器只支持字符串,所以传参时最好用JSON.stringify()序列化
- origin:协议+主机+端口号,也可以设置为"*",表示可以传递给任意窗口,如果要指定和当前窗口同源的话设置为"/"
下面是一个示例:
页面A www.domain1.com/a.html:
<iframe id="iframe" src="http://www.domain2.com/b.html" style="display:none;"></iframe>
<script>
    const iframe = document.getElementById('iframe');
    iframe.onload = function() {
        var data = {
            name: 'aym'
        };
        // 向 domain2 传送跨域数据
        iframe.contentWindow.postMessage(JSON.stringify(data), 'http://www.domain2.com');
    };

    // 接受 domain2 返回数据
    window.addEventListener('message', function(e) {
        alert('data from domain2 ---> ' + e.data);
    }, false);
</script>
页面B www.domain2.com/b.html:
<script>
    // 接收 domain1 的数据
    window.addEventListener('message', function(e) {
        alert('data from domain1 ---> ' + e.data);

        var data = JSON.parse(e.data);
        if (data) {
            data.number = 16;
            // 处理后再发回 domain1
            window.parent.postMessage(JSON.stringify(data), 'http://www.domain1.com');
        }
    }, false);
</script>
代理跨域
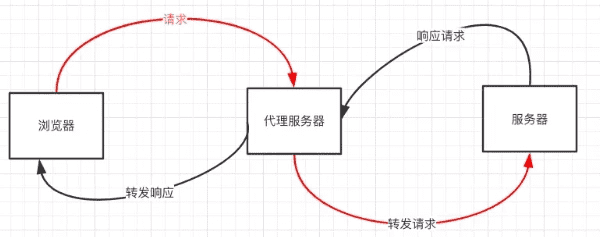
同源策略是浏览器需要遵循的标准,而如果是服务器向服务器请求就无需遵循同源策略。这就是代理跨域的思路的,通过多加一层中间层实现请求的转发。
下面介绍两种常用的思路:
- 代理服务器跨域:使用 Node.js 中间件实现请求的转发
- nginx 反向代理:使用 nginx 服务器实现请求的转发
代理服务器跨域
对于前端来说,代理服务器跨域一般可以用 Node.js 搭建。
设置代理服务器,需要做以下几个步骤:
- 接受客户端请求
- 将请求转发目标给服务器
- 拿到目标服务器响应数据
- 将响应转发给客户端

这个的方案的好处,在于浏览器和代理服务器保持同域状态,靠代理服务器和目标服务器进行沟通,对于前端部分来说,无需多作配置。
在具体的项目实践中,前端开发可以用 Node.js 来搭建中间服务层,用于启动页面,接受接口的请求,然后去向目标 API 服务器获取响应数据,再转发给前端。这就是所谓的 Backend for frontend 实践。
nginx 反向代理
实现原理类似于代理服务器跨域,需要搭建一个中转 nginx 服务器,用于转发请求。
实现思路:通过 nginx 配置一个代理服务器(域名与 domain1 相同,端口不同)做跳板机,反向代理访问domain2 接口,并且可以顺便修改 cookie 中 domain 信息,方便当前域 cookie 写入,实现跨域登录。
配置 nginx:
// proxy服务器
server {
    listen 81;
    server_name  www.domain1.com;
    location / {
        # 反向代理
        proxy_pass   http://www.domain2.com:8080;
        # 修改 cookie 里域名
        proxy_cookie_domain www.domain2.com www.domain1.com;
        index index.html index.htm;
        # 当用 webpack-dev-server 等中间件代理接口访问 nignx 时,此时无浏览器参与,故没有同源限制,下面的跨域配置可不启用
        add_header Access-Control-Allow-Origin http://www.domain1.com;
        # 当前端只跨域不带cookie时,可为*
        add_header Access-Control-Allow-Credentials true;
    }
}
前端页面:
// www.domain1.com index.html
const xhr = new XMLHttpRequest();
// 前端开关:浏览器是否读写 cookie
xhr.withCredentials = true;
// 访问 nginx 中的代理服务器
xhr.open('get', 'http://www.domain1.com:81/?user=admin', true);
xhr.send();
目标 domain2 的服务器(以 node 为例):
// server.js
const http = require('http');
const server = http.createServer();
const qs = require('querystring');
server.on('request', function(req, res) {
    const params = qs.parse(req.url.substring(2));
    // 向前台写cookie
    // 这里的 domain2 会在 nginx 的 proxy_cookie_domain 配置中被替换
    res.writeHead(200, {
        'Set-Cookie': 'l=a123456;Path=/;Domain=www.domain2.com;HttpOnly'   // HttpOnly:脚本无法读取
    });
    res.write(JSON.stringify(params));
    res.end();
});
server.listen('8080');
console.log('Server is running at port 8080...');
区别总结
上述两种思路都是常用的实践,本质上是一样的。适合前后端分离的前端项目调后端接口。
使用 nginx 反向代理也可以用在本地 dev 测试。比如前端项目在开发时常用的 webpack-dev-server,启动静态资源服务器,生成以 127.0.0.1 为 host 的资源地址,如果需要像线上有一样的正式路径进行调试,则可以使用 nginx 进行请求的匹配和转发:
// proxy服务器
server {
    listen 81;
    server_name  *.dev.flights.com;
    location /static {
        # 反向代理
        proxy_pass  http://127.0.0.1:8080;
    }
}
WebSocket
WebSocket protocol 是 HTML5 一种新的协议。它实现了浏览器与服务器全双工通信,同时允许跨域通讯,是 server push 技术的一种很好的实现。
本节不准备对 ws 作细节整理了,只知道使用 ws 是可以进行跨域的,后续有学习再整理。
总结
- CORS 支持所有类型的 HTTP 请求,是跨域 HTTP 请求的根本解决方案
- JSONP 只支持 GET 请求,JSONP 的优势在于支持老式浏览器,以及可以向不支持 CORS 的网站请求数据
- 不管是代理服务器跨域还是 nginx 反向代理,主要是通过同源策略对服务器不加限制
- 日常工作中,用得比较多的跨域方案是 CORS 和 nginx 反向代理